FAQ
Here you will find answers to common questions. Please also refer to the general documentation
Operations
MAC address Issues detaching/attaching network interfaces
With recent Debian-based systems (e.g. Debian12, Ubuntu20+) detaching and re-attaching network interfaces to VMs can raise issues.
The cause is that the MAC address of the NIC is hard-written in the netplan (/etc/netplan/netplan.yaml) file via cloud-init at instance creation. If the network interface is removed and reattached the system cannot assign the new MAC address, raising the following error on the console log:
... stages.py[WARNING]: Failed to rename devices: [nic not present] Cannot rename mac=fa:16:3e:69:15:67 to ens3, not available.
As a consequence, the VM is no longer reachable
Here is the procedure to correctly detach a VM NIC from Network A and attach to Network B.
On the OpenStack dashboard, go to Network -> Networks
Select the private network attached to the VM (Network A) and click on Ports
- Find the port attached to the VM (e.g. looking for the IP address) and copy the correspondent MAC address
(alternatively: SSH log on the machine; cat file /etc/netplan/<netplan_name>.yaml and copy the MAC address)
Important: Take note of the SECURITY GROUPS attached to the VM as they will get detached together with the NIC!
- Detach the interface from the VM (Have you copied the MAC address?):
go to Compute -> Instances; from the drop-down menu of the VM select Detach interface; on the pop-up windows select the IP address of the VM, then click Detach interface
Go to Network -> Networks, select the network to be attached to the VM (Network B), click on Ports
Click on Create Port
On the pop-up window optionally choose a name for the port and PASTE the original MAC address in the MAC Address box
Go back to the Instance page
from the drop-down menu of the VM select Attach interface
From the menu “The way to specify an Interface” select “By Port” and in the Port menu select the port previously created
From the drop-down menu of the VM select Edit security Groups
Re-add the security group previously attached to the VM
Reboot the VM
Now the VM is correctly attached to the new network!
non-default (FAST and CAPACITY) volume types (garr-ct1 and garr-pa1 regions)
We have enabled two new volume types in Catania and Palermo regions:
volume type FAST: based on SSD disks
volume type CAPACITY: provides the same durability and nearly the same performance as the default type, but is better suited to build large volumes (> 1 TB).
To create e.g. a SSD-based volume simply select the volume type “fast” in the “type” menu on the dashboard, or with the following CLI command:
openstack volume create --type fast --size 10 test-ssd
N.B. By default fast volumes quota is set to zero. Users who need fast disks should make a request to cloud-support@garr.it.
How can I change volume type (garr-ct1 and garr-pa1 regions)
It is possible to change the type of existing volumes, e.g. from default to fast (based on SSD) type.
To do so, first of all the volume must be detached and must not have snapshots (therefore it is not possible to change the type of system volumes).
From the dashboard select the volume and from the scroll-down menu select “Change Volume Type”. N.B. don’t forget to choose “Migration Policy: On Demand!”
With the OpenStack CLI the volume retype command is:
openstack volume set --type <new_type> --retype-policy on-demand <volume-id>
I need to migrate an instance from a region to another one
Please note that you need enough resource quota for the same project on the target region.
Perform the following steps:
login at https://dashboard.cloud.garr.it
select the project and region where the instance is running
shut down the instance
select “Volumes” on the left
locate the volumes attached to the instance by looking at the “Attached To” column
note the volume attached to /dev/vda, as this will be used on the target region to launch the instance
for each of the volumes attached to the instance:
on the drop down menu on the right, choose “Upload to Image”
chose an image name
select “QCOW2” as the disk format
check the “Force” checkbox
click on “Upload”
change to the target region (e.g. “garr-pa1”)
select “Compute”, “Images” on the left and wait for the images to be in the “Active” status
locate the image previously created from the volume attached to /dev/vda, click “Update Metadata” and make sure that “signature_verified” metadata is not present (if so, remove it and then click “Save”)
click “Launch” next to the image
go through the instance launching steps. Make sure to select a disk size much larger than the size of the image (the image is compressed and so the size reported isn’t ‘real’). If the VM creation fails because of the insufficient disk size (check the vm details) retry and choose a larger disk size.
assign a new floating IP to the instance
go back to “Compute”, “Images” and for each of the other creted images:
select “Create Volume”
attach the new volume to the instance
check that everything is working (if not, check the security groups)
if everything looks good, go back on the source region and destroy the instance to free resources
If you instead prefer the CLI, the command to create images from voumes is the following:
$ openstack image create --disk-format qcow2 --volume <volume id> --force <image name>
I can’t start an ephemeral VM
If you have stopped an ephemeral VM and you get an error when you try to start it, you can create it again from a previous snapshot. Instructions on how to start a VM from a snapshot are here:
I get error making a snapshot of a running instance
Some recent distributions (Debian 9, Ubuntu 18) require to install the package qemu-guest-agent in order to perform snapshot while the instance is running. Therefore either shut the instance off or install the package:
$ sudo apt update
$ sudo apt install qemu-guest-agent
I need to add extra storage to my DaaS VM
In order to add extra storage to VMs created via DaaS, proceed as follows:
Open the GARR Cloud dashboard
Go to Volumes -> Volumes -> Create volume
Set a name for your volume
Set the size
Click on Create volume
From the drop-down menu associated to the volume, select Manage attachments
Select the DaaS created instance
Select Attach Volume
From Juju cli (https://cloud.garr.it/apps/daas/), execute these commands:
Add your public key to your juju model (you can generate a key pair with the ssh-keygen -t rsa command):
juju add-ssh-key "$MY_PUBLIC_KEY"
Connect to the VM via ssh (use juju status to get the machine number to connect to):
juju ssh vm_number
Become root:
sudo su -
Check that the volume previously created on the GAAR Cloud dashboard is associated to the instance (you should see /dev/vdb):
fdisk -l
Format the volume:
mkfs.xfs /dev/vdb
Mount the volume on a directory of your choice (eg: /mnt):
mount -t xfs /dev/vdb /mnt
Check that /dev/vdb is mounted on /mnt:
df -h
I get a timeout accessing GARR Cloud dashboard with my EduGain/IDEM/Google credentials!
This might be caused by a firewall set on your institutional network. Please check with your network admins that the necessary ports used by GARR Cloud services are opened. The ports are listed in the next post: “Which ports should I open on my router to access GARR Cloud platform?”
Which ports should I open on my router to access GARR Cloud platform?
GARR Cloud services are exposed on a few TCP ports which should be accessible from your institution network. Please check on the following tables the service hostname and IP addresses and the corresponding ports.
First of all, ensure that the standard HTTP 80 and HTTPS 443 ports are opened.
To access to GARR Cloud Dashboard with EduGain/IDEM/Google account:
+------------+------------------------+----------------+------------+
| service    | hostname               | IP address     | port       |
|------------+------------------------+----------------+------------+
| keystone   | keystone.cloud.garr.it | 90.147.165.91  | 5000       |
+------------+------------------------+----------------+------------+
To check that the port is open type this address on a browser:
https://keystone.cloud.garr.it:5000
The server should reply with a string like:
{"versions": {"values": [{"status": "stable", ... }
To access to DaaS (Juju) Web GUI:
+-------------------------+------------------------+----------------+------------+
| service                 | hostname               | IP address     | port       |
+-------------------------+------------------------+----------------+------------+
| DaaS (garr-ct1 region)  | daas-ct.cloud.garr.it  | 90.147.167.223 | 17070      |
+-------------------------+------------------------+----------------+------------+
| DaaS (garr-pa1 region)  | daas-pa.cloud.garr.it  | 90.147.188.122 | 17070      |
+-------------------------+------------------------+----------------+------------+
To check that the aforementioned ports are opened try to access to the DaaS web GUI:
https://daas-pa.cloud.garr.it:17070/gui/
To access GARR Cloud via OpenStack API libraries:
+-------------------------------+---------------+----------------+------------+
| service                       | hostname      | IP address     | port       |
+-------------------------------+---------------+----------------+------------+
| nova (garr-pa1 region)        |               | 90.147.159.93  | 8774       |
+-------------------------------+---------------+----------------+------------+
| nova (garr-ct1 region)        |               | 90.147.165.93  | 8774       |
+-------------------------------+---------------+----------------+------------+
| cinder (garr-pa1 region)      |               | 90.147.159.90  | 8776       |
+-------------------------------+---------------+----------------+------------+
| cinder (garr-ct1 region)      |               | 90.147.165.95  | 8776       |
+-------------------------------+---------------+----------------+------------+
| placement (garr-pa1 region)   |               | 90.147.159.93  | 8778       |
+-------------------------------+---------------+----------------+------------+
| placement (garr-ct1 region)   |               | 90.147.165.93  | 8778       |
+-------------------------------+---------------+----------------+------------+
| glance                        |               | 90.147.165.94  | 9292       |
+-------------------------------+---------------+----------------+------------+
| neutron (garr-ct1 region)     |               | 90.147.165.96  | 9696       |
+-------------------------------+---------------+----------------+------------+
| neutron (garr-pa1 region)     |               | 90.147.159.96  | 9696       |
+-------------------------------+---------------+----------------+------------+
Quota exceeded when launching an instance
You might be using a region on which your project has no allocated resources. Follow the instructions for selecting a region where your project has available resources.
Can I change/ask for a new password?
If you registered through a federated IdP (IDEM or EduGain), you wuld have to change the password though your Identity Provider. Use the dashoard only for changing the Cloud GARR password.
Can I import custom VM images to the cloud (e.g. a VirtualBox image)?
Yes, follow the instructions on the following link to convert in the correct format: https://cloud.garr.it/support/kb/openstack/manageCustomImages/
Can I spawn Windows images?
Yes, the relevant image is labeled “GARR”, for example
WindowsServer2012R2 - GARR,
but please note that when creating a new machine you need to
make sure you also set a ``Key Pair``.
In fact, for Windows machines the key pair is used to encrypt the
Administrator password which is automatically generated and injected
in the machine at first boot.
To retrieve the Administrator password (the initial boot will likely
take several minutes):
CLI method: execute the command (you will be prompted for the SSH key passphrase):
nova get-password <server_UUID> /path/to/private/key/file
GUI method: open another browser tab, navigate to the VM list, pick the
Retrieve passwordaction for your VM, which should open a window in which you can select or copy/paste your private key to be used for decryption. If you don’t get the chance to input your private key, open the Console GUI, as the server most likely needs you to answer some question or push button to proceed.
NOTE:
There is a problem in the dashboard currently: the Retrieve password menu opens a window where to paste the private key and a field where to get the password, but this mechanism fails with Could not decrypt the password. However, the encrypted password is shown, and it can be de-crypted in the following way:
Copy-paste the encrypted password
Decode the encrypted password and save to a file:
echo "<encrypted_password>" | base64 -d > encrypt_pass.txt
Decrypt the password:
openssl rsautl -decrypt -in encrypt_pass.txt -out plain.txt -inkey <your_private_ssh_key>
Find the decripted password in file
plain.txt
I have created a Linux VM, injected my ssh key and assigned a floating IP. Now how do I log into it?
To log into a virtual machine, use the ssh command on your host machine, using the keypair you selected when creating the instance.
But first, make sure the SecurityGroups configured for your server allow connection to port 22 from your subnet (or from the Universe, namely 0.0.0.0, although this is generally not advised). You can update the default SecurityGroup, or create a new one from Project - Network - Security Groups, and add one or more rules for SSH for your different subnets.
Each Linux operating system provides a default account on which to login with a keypair:
for Ubuntu images, login as ubuntu
for CentOS images, login as centos
for Cirros images, login as cirros
for Debian images, login as debian
for Fedora images, login as fedora
Warning
Ensure the keypair file has the proper access rights:
$ chmod 400 MyKey.pem
Invoke ssh specifying the keypair and the IP address of the instance; for example:
$ ssh -i MyKey.pem ubuntu@90.147.27.2

Last login: Tue Jan 12 11:20:28 2016
$
Can I log in as root on a Linux VM?
Logging in as root is disabled by default on Linux VMs.
Log in with the default account, as explained above, and use sudo to issue privileged commands.
Do sudo -s to open a root shell.
I get an error when I issue the sudo command
If inside a VM you try to issue the sudo command, e.g. sudo -s and you get the following error:
sudo: unable to resolve host
then the problem is likely due to a missing entry in /etc/hosts. This can be fixed either when creating the VM(s) or directly from within the VM(s).
At VM creation time, you can supply an user data script through the following steps:
prepare an userdata.txt file with the following content:
#cloud-config
manage_etc_hosts: true
then either:
from the dashboard, supply it in the Configuration section of the new instance creation dialog
from the command line, use the –user-data flag of the openstack server create command, e.g.:
openstack server create --image 39e0b535-9c21-42af-9096-397c3687664e --flavor m1.small --nic net-id=default --key mykey --user-data userdata.txt myinstance
From inside the VM, the problem can be fixed by issuing the following command:
echo "manage_etc_hosts: true" | sudo tee /etc/cloud/cloud.cfg.d/99_etchosts.cfg > /dev/null
and then rebooting the VM:
reboot
I get an error when creating an instance
If you get an error like this while creating an instance:
Exceeded maximum number of retries. Exceeded max scheduling attempts 3 for
instance (...) Last exception: Binding failed for port (...)
please ensure that you did not select the network named `floating-ip` in the Network tab when launching the instance, but either a project specific net or the default net.
Error when rebooting an instance “Image UUID could not be found”
If you get an error like this while rebooting an instance:
Image b1d6e7ff-8397-4b80-8972-d6402382f213 could not be found.
it means that the original image used to create the instance has been deleted.
In order to fix the problem you first need to identify a suitable current image: for example, if the original machine was built using “Debian 8.7” you may select “Debian - 8 - GARR” as a replacement:
$ openstack image list | grep GARR | grep Debian
| 70eb2fbb-e195-4147-9cf8-871b28b6331d | Debian 8 - GARR                                        | active  |
and then execute:
for machines built on non-ephemeral disk:
export theSrvUUID=<theUUIDofTheServerInError>
export theImgUUID=70eb2fbb-e195-4147-9cf8-871b28b6331d
nova reset-state --active  $theSrv
nova rebuild --poll $theSrv $theImgUUIDNew
for machines built on ephemeral disk, ask Cloud admins for help, since a rebuild would, in this case, wipe all your local changes. Cloud admins will:
nova reset-state --active  $theSrv
# update the OpenStack database: update instances set image_ref='newUUID' where image_ref='disappearedUUID' and uuid='srvUUID';
nova reboot --poll $theSrv
Which network should I choose when creating an instance?
In the Launch Instance / Networks tab select between:
the pre-created internal network default which is connected to a router on the external network and allows assinging floating IPs to the VM.
Warning
this network is shared among all projects, hence all VMs on this network belong to the same broadcast domain and can reach each other.
any user-defined project network.
Do not select the external network floating-ip as VMs cannot be attached to external networks.
apt-get in a Docker hangs
This might occur on Ubuntu 16 (not on Ubunto 14 or CentOS).) If a network request hangs, for example doing:
$ docker run -it ubuntu bash
# apt-get update
0% [Waiting for headers]
the solution is to clamp the MTU (Maximum Transmission Unit) to the MSS (Maximum Segment Size) with the following command:
$ sudo iptables -I FORWARD -p tcp --tcp-flags SYN,RST SYN -j TCPMSS --clamp-mss-to-pmtu
Can I add more than one Floating IP to an instance?
Due to limitations of the OpenStack dashboard this is only possible through the CLI on the OpenStack controller as follows:
from the Dashboard add an interface to the VM
from the VM console activate the interface (ifup with the corresponding private ip that appears in the dashboard)
add the Floating IP with the CLI command:
$ neutron floatingip-associate $FIP $PORT_IDwhere FIP is a floating IP id that you get from:
$ neutron floatingip-listand PORT_ID is the id of the port with the correct private IP (non floating) returned by:
$ neutron port-list
How do I log into a Juju controller
The command juju controller-config supplies most information about a controller. To find out more, look at this file on the machine where you bootstrapped the controller:
~/.local/share/juju/controllers.yaml
From there you can see the IP address of the controller, and you can log into it via ssh using the locally stored keypair:
$ ssh -i ~/.local/share/juju/ssh/juju_id_rsa ubuntu@10.3.1.0
Can I get storage for doing backups of my data?
The GARR Cloud Platform currently provides just computing facilities. However, nothing prevents using the storage assigned to a project for specific usage. One can for example create an Object Storage and use it to store its data. Here is a quick guide on how to use Swift for doing backups.
Boot instances on volume via CLI
Here is an example of the CLI command to boot an instance directly on volume:
openstack server create --key-name $KEY --security-group $SECGROUP --image $IMAGE_NAME --boot-from-volume $SIZE --network $NETWORK_NAME --availability-zone=$AZ_NAME --flavor $FLAVOR $SERVER_NAME
where:
$KEY is the name of the public SSH key (retieve them with openstack keypair list)
$FLAVOR is the flavor name (openstack flavor list)
$NETWORK_NAME is the name of the private network (openstack network list)
$SECGROUP is the name of the security group (openstack security group list –project MY_PROJECT)
$IMAGE_NAME is the name of the image to boot the VM from (openstack image list)
$SIZE is the size of the volume in GB
$SERVER_NAME is the name of the VM
For example:
openstack server create --image "CentOS 8 - GARR" --boot-from-volume 100 --network default --availability-zone=testCompute-DO-NOT-USE --flavor m3.xxl test-xxl
Can I use object storage for backup?
Following a link with a quick guide at backup on object storage: https://elastx.se/en/blog/getting-started-application-backups-to-swift
endpoints at the moment of writing are (October 2018):
| bd9e71c06c1e498d9d70382d871bd139 | garr-ct1   | swift          | object-store    | True    | public    | http://90.147.165.90:80/swift/v1                               |
| d90c07bd83b94dc695eb090c7010f646 | garr-pa1   | swift          | object-store    | True    | public    | http://90.147.165.90:80/swift/v1                               |
How can I clone an existing instance?
A recommended procedure for cloning an instance is to perform the following operations:
shut off the instance to be cloned
create a snapshot of the instance
verify that the snapshot is indeed among the images of the current project
launch a new VM, selecting “instance snapshot” as “boot source” and then selecting the above-created snapshot
How can I transfer a volume from a project to another one?
In the tab Volumes->Volumes detach the volumes selecting Manage Attachments from the drop down menu of the volume and then clicking on Detach
Create transfer from the volume, selecting the option from the drop down list of the volume
Download transfer credential that you will be asked to use later
Go to the destination project, in the Volumes tab and click on Accept Transfer
Complete the fields with Transfer ID and Authorization Key, then click on Accept Volume Transfer
Attach the volume to the instance clicking on Manage Attachments
ssh in the instance and mount the volume with sudo mount -t xfs /dev/vdb <your_dir>
How can I move an instance from a project to another one?
Instance on volume
In the tab Compute->Instances shut down the instance to move, selecting the command from the dropdown menu near the instance
Switch to tab Volumes->Volumes and create a snapshot of the primary volume (vda) of the instance above, selecting the option from the drop down menu near the volume entry
In the tab Volumes->Snapshot, create a volume from the snapshot just created
In the tab Volumes->Volumes create transfer from the volume just created, selecting the option from the drop down list of the volume just created
Download transfer credential that you will be asked to use later
Go to the destination project, select the Volumes->Volumes tab and click on Accept Transfer
Complete the fields with Transfer ID and Authorization Key, then click on Accept Volume Transfer
On the just transfered volume select Launch as Instance and create the new instance from the volume
Ephemeral instance
In the tab Compute->Instances, shut down the instance to move, selecting the command from the dropdown menu near the instance
Create a snapshot from the instance, selecting the option from the drop down menu of the instance
Go to Images and select Create Volume
In the tab Volumes->Volumes create transfer from the volume just created, selecting the option from the drop down list of the volume just created
Download transfer credential that you will be asked to use later
Go to the destination project, in the Volumes tab and click on Accept Transfer
Complete the fields with Transfer ID and Authorization Key, then click on Accept Volume Transfer
On the just transfered volume select Launch as Instance and create the new instance from the volume
If you have other volumes mounted to the instance, follow the instructions in How can I transfer a volume from a project to another one?.
After have checked that your instance is working properly, you can delete it, and all the associated volumes, from the original project.
Architecture
Can you describe the architecture of the platform?
Here is the Reference Cloud Architecture document.
Why did you choose Juju for automation?
There are several tools for OpenStack automation. The most poplura ones are Chef, Puppet, Ansible, ‘SaltStack` and Juju. Here is a brief comparison. Here is a video of a presentation on Chef vs Puppet vs Ansible vs Salt. Our choice fell on Juju because is a tool that covers all aspects of automation deployment and maintenance, from hardware, to cloud and to application provisioning.
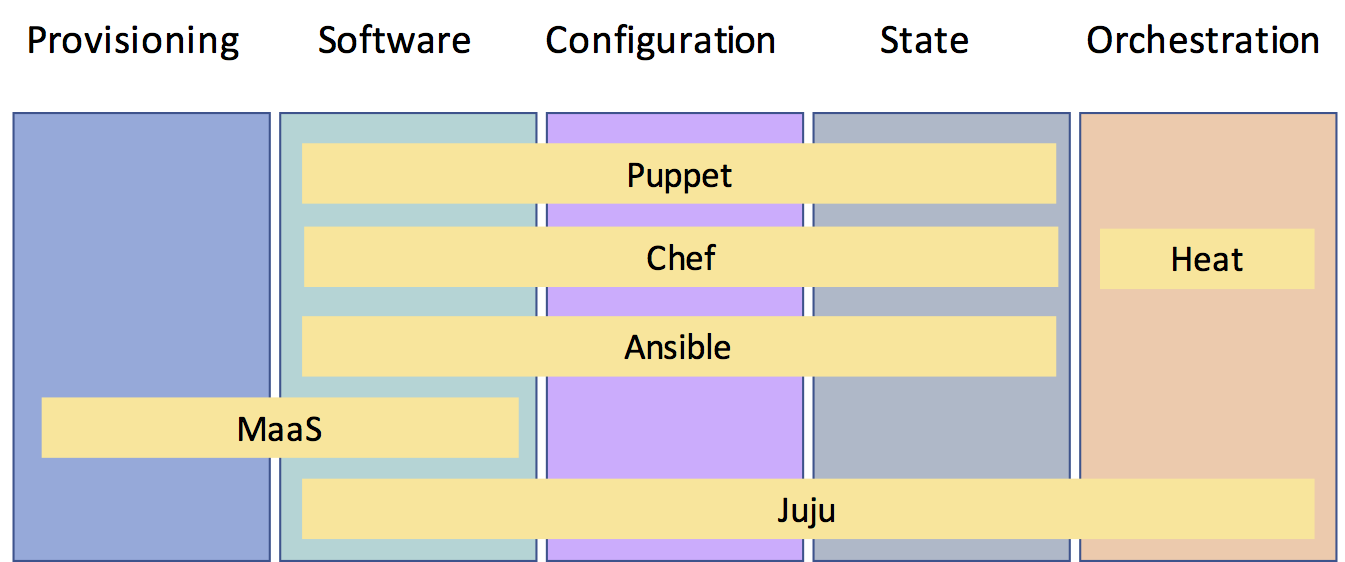
This table provides a comparison of tool coverage.
✔
Task
Puppet
Chef
Salt
Ansible
Juju
Rolling Updates
x
x
x
x
x
Health Check
✔
✔
x
x
✔
Backup Restore
x
x
x
x
✔
Networking
x
x
x
x
✔
Storage
x
x
x
x
✔
VM provisioning
x
x
x
x
✔
Life cycle Mgmt
x
x
x
x
✔
Relation Mgmt
x
x
x
x
✔
Service Discovery
–
–
x
x
✔
Config. Packaging
✔
✔
✔
✔
✔
Templating
✔
✔
✔
✔
✔
Service Provisioning| Yes
✔
✔
✔
✔
Can I use Ansible for automation?
Juju charms consists of scripts and configuration settings files. Scripts can be used in any language, and in particular they can be written in Ansible.
Can I use Juju with Puppet or Chef?
Puppet and Chef are great tools for configuring servers and keeping them consistent across a network. Juju works a layer above that by focusing on the service the application delivers, regardless of the machine on which it runs. One of the main advantages of Juju is its dynamic configuration ability, which allows you to re-configure services on the fly, add, remove, or change relationships between services, and scale in or out with ease. If you are using a configuration management tool to get your machines up and running, Juju can complement it with the service modelling layer which performs all the tasks described above. Integration is quite straightforward. Because Juju charms can be written in any language, you can include your existing Puppet or Chef code in a Juju charm. No need to write new code. Model, connect and configure. The charm browser has hundreds of charms and bundles allowing you to build complex services and see them deployed in the GUI.
Do you handle containers?
Take a look at the GARR Container Platform.
A comparision of container orchestration tools is described in Orchestration tool roundup Kubernetes vs. Docker vs. Heat vs. Terraform vs. Tosca.
Policy
What are the terms of service?
Look at this document.
Do you charge for bandwidth?
No.
Do you monitor egress traffic?
Yes. Traffic is monitored in order to avoid abuse and abnornal traffic is reported to you. If you are unable to stop abnormal traffic, this may lead to your account suspension or termination.
Certain types of traffic are not allowed: torrents, spam, ssh probes, hacking attempts, botnets, ddos, etc.
I have registered through the Form-based registration and now I am trying to log into https://dashboard.cloud.garr.it. Which Domain should I use?
Please enter cloudusers in the domain field.
How to get a Graphical GUI for your OpenStack VM (tested on Ubuntu 20.04 server and Ubuntu 22.04 Server)
This FAQ explains how to install a grphical Environment and VNC on an OpenStack instance and how to access it without exposing VNC service to the Internet.
Requirements for local machine:
a VNC Client (Remmina, TigerVNC, ChickenOfTheVNC…)
an SSH Client
The following instructions work straightforward on Linux and MacOS; on Windows some adjustments are required, it depends on your SSH Client.
**XFCE4 Desktop Environment (Ubuntu 20.04 Server) **
SSH login to your OpenStack VM
- install XFCE4: sudo apt-get install xfce4 xfce4-goodies gnome-icon-theme tigervnc-standalone-server
(if you need a more complete desktop environment then install also xubuntu-desktop)
create a .vnc folder in your user home: mkdir .vnc
create xstartup file in ~/.vnc/ and paste the following content:
#!/bin/bash
xrdb $HOME/.Xresources
startxfce4 &
run vncpasswd and set VNC password (you can skip the viewer password)
- run vncserver -geometry WIDTHxHEIGHT -localhost yes -rfbport PORT, replace WIDTH and HEIGHT with
desired values (ex: 1024x768) and PORT (ex: 5901, default port)
- on your local machine run: ssh -L LOCAL_PORT:127.0.0.1:PORT USER@VM_IP; choose a port and replace
LOCAL_PORT with a valid port; replace PORT with the same port used in previous step.
on your local machine run a VNC Client and connect to 127.0.0.1:LOCAL_PORT, when required insert VNC password (from step 5)
**XFCE4 Desktop Environment (Ubuntu 22.04 Server) **
SSH login to your OpenStack VM
- install XFCE4: sudo apt-get install xfce4 xfce4-goodies gnome-icon-theme tigervnc-standalone-server tigervnc-common tigervnc-tools
(if you need a more complete desktop environment then install also xubuntu-desktop)
create a .vnc folder in your user home: mkdir .vnc
create xstartup file in ~/.vnc/ and paste the following content:
#!/bin/sh
# Start up the standard system desktop
unset SESSION_MANAGER
unset DBUS_SESSION_BUS_ADDRESS
/usr/bin/startxfce4
[ -x /etc/vnc/xstartup ] && exec /etc/vnc/xstartup
[ -r $HOME/.Xresources ] && xrdb $HOME/.Xresources
x-window-manager &
run vncpasswd and set VNC password (you can skip the viewer password)
- run vncserver -geometry WIDTHxHEIGHT -localhost yes -rfbport PORT, replace WIDTH and HEIGHT with
desired values (ex: 1024x768) and PORT (ex: 5901, default port)
- on your local machine run: ssh -L LOCAL_PORT:127.0.0.1:PORT USER@VM_IP; choose a port and replace
LOCAL_PORT with a valid port; replace PORT with the same port used in previous step.
on your local machine run a VNC Client and connect to 127.0.0.1:LOCAL_PORT, when required insert VNC password (from step 5)
GNOME Desktop Environment (Ubuntu 20.04 Server)
SSH login to your OpenStack VM
install XFCE4: sudo apt-get install ubuntu-gnome-desktop gnome-icon-theme tigervnc-standalone-server
create a .vnc folder in your user home: mkdir .vnc
create xstartup file in ~/.vnc/ and paste the following content:
#!/bin/sh
# Start Gnome 3 Desktop
[ -x /etc/vnc/xstartup ] && exec /etc/vnc/xstartup
[ -r $HOME/.Xresources ] && xrdb $HOME/.Xresources
vncconfig -iconic &
dbus-launch --exit-with-session gnome-session &
run vncpasswd and set VNC password (you can skip the viewer password)
- run vncserver -geometry WIDTHxHEIGHT -localhost yes -rfbport PORT, replace WIDTH and HEIGHT with
desired values (ex: 1024x768) and PORT (ex: 5901, default port)
- on your local machine run: ssh -L LOCAL_PORT:127.0.0.1:PORT USER@VM_IP; choose a port and replace
LOCAL_PORT with a valid port; replace PORT with the same port used in previous step.
on your local machine run a VNC Client and connect to 127.0.0.1:LOCAL_PORT, when required insert VNC password (from step 5)
When you do not need anymore VNC you can stop it; on your OpenStack VM:
run vncserver –list, you should get a list of active VNC displays:
testuser@test-gui:~$ vncserver --list

TigerVNC server sessions:

X DISPLAY #        RFB PORT #      PROCESS ID
:2         5902            36811
kill the proper VNC display: vncserver -kill :DISPLAY, replace DISPLAY with correct value (ex: 2 in our example)
logout
To restart VNC server just login and follow steps from 6. to 8..